Passive Design Strategies
Passive Design
To keep people comfortable you’ll need to use the right combination of passive and active design strategies. High-performance buildings use the right blend of passive and active design strategies to minimize energy, materials, water, and land use.
Passive design strategies use ambient energy sources instead of purchased energy like electricity or natural gas. These strategies include daylighting, natural ventilation, and solar energy.
Active design strategies use purchased energy to keep the building comfortable. These strategies include forced-air HVAC systems, heat pumps, radiant panels or chilled beams, and electric lights.
Hybrid systems use some mechanical energy to enhance the use of ambient energy sources. These strategies include heat recovery ventilation, economizer ventilation, solar thermal systems, radiant facades and even ground source heat pumps might be included in this category.
In general, you’ll want to optimize your design for passive strategies first. Doing so can often downsize the active systems you’ll need to install.
Consider the analogy of a sailboat, which uses natural forces to propel a boat through water. Similarly, you can ‘sail’ your building and keep its occupants comfortable by using passive design strategies for heating, cooling and ventilation.
Understanding how to design for human comfort will help you pick the right passive design strategies.
Building Massing & Orientation
“Massing” is deciding on the overall shape and size of the building. Will the building be tall or short? Long and thin? Will it have significant cutouts, or be more solid? Successful massing uses the general shape and size of the building to minimize energy loads as much as possible and to maximize free energy from the sun and wind.
Orientation is simply what compass direction the building faces. Does it face directly south? 80° east-northeast? Along with massing, orientation can be the most important step in providing a building with passive thermal and visual comfort. Orientation should be decided together with massing early in the design process, as neither can be truly optimized without the other.
Aside for reducing energy use and enabling passive design strategies, successful massing and orientation can take advantage of site conditions, such as rainwater harvesting, and can help the building contribute to the health and vitality of the surrounding ecological, social, and economic communities. For instance, it can be massed and oriented to connect its social spaces with street life, or avoid shading nearby wild lands, or could steer foot traffic away from ecologically sensitive areas.
Building Massing

In this image you can see several massing strategies: The extreme “O-shaped” building in the middle, the blocky building on the left with the street-level protrusion, and the large building on the right with the arched roof. Many of these choices were made for aesthetic reasons, but massing is very important for energy use.
For many building types, massing is one of the most important factors in passive heating, cooling, and daylighting, yet often these are not considered until after massing is finished. It’s important to begin considering passive design strategies in the massing stage, so that the surface areas exposed to sun at different times of day, building height, and building width can all be optimized for passive comfort.
In the image below, “Opt 2” has the same area as “Opt 1” but uses less than half the energy, because of better massing.

Massing decisions depend on the specifics of the project site and goals. BIM tools can provide designers with early conceptual energy analysis to test different massing options. This analysis can take into account how site features like natural land formations, surrounding buildings, or vegetation affect the performance of the design. Such features can shade the sun and change wind patterns, so this is especially important for thermal comfort and daylighting comfort. They can also affect acoustics, rainwater harvesting, and other performance factors.
Massing for Building Program
The right massing depends on the building’s program. Sparsely populated buildings with little activity or equipment, such as many homes, generate relatively little heat from internal loads. In cold climates, they benefit from compact floor plans to avoid losing heat to the outside. This minimizes the ratio of surface area to volume, lowering heat loss to wind and radiant cooling.
On the other hand, densely populated buildings with high activity and/or energy-intensive equipment generate a great deal of heat, causing high internal cooling loads. Thus, even in colder climates it may be advantageous for such buildings to have thinner floor plans, to get more cooling for free.

Sophisticated massing can go even further to optimize heat gains or cooling. For instance:
- Roofs can be angled for optimal solar heating.
- Reveals and overhangs can shade parts of a building with other parts of the same building.
- Aerodynamic curves can reduce heat loss from infiltration.
- Interior buffer zones can be placed in a building’s west side to protect living and working areas from the hot afternoon sun (for example stairs, restrooms, entry corridors, etc.)
Whether your massing is simple or sculptural, you should perform basic energy modeling simulations of many different options.

Different building orientations
Building OrientationOrientation is simply what compass direction the building faces. It should be optimized early-on, along with massing, and can be the most important step for passive design.
Orientation is measured by the azimuth angle of a surface relative to true north. Successful orientation rotates the building to minimize energy loads and maximize free energy from the sun and wind.

A building’s orientation is measured by azimuth
Passive Heating
Passive heating uses the energy of the sun to keep occupants comfortable without the use of mechanical systems. These concepts will help you design for passive heating.
Direct Solar Gain
Direct gain is the heat from the sun being collected and contained in an occupied space. This heat can be retained by the building’s thermal mass, or can be avoided with reflective materials.
Direct solar gain is important for any site that needs heating, because it is the simplest and least costly way of passively heating a building. Avoiding direct solar gain is also important in hot sunny climates.
Good direct gain is measured or predicted by determining how much heat energy the sun delivers to the interior space throughout the day and year. In many climates, more heat gain is desired in the winter, when the sun is low, while less or none is desired in the summer. Likewise, it is usually desired more in the morning, but less or none in the late afternoon. Direct gain is not the total amount of incident solar radiation, since not all of that will enter and be retained in the space.

Direct gain through walls / roofs, and through glazing
Sunlight can heat a space through the solid walls or roofs of the envelope. Sunlight also enters the space through windows, and heats interior surfaces.
Some of the sun’s light is long-wavelength radiation, which is heat; in addition, the light of any wavelength absorbed by surfaces turns into heat in those materials. These materials then warm people in the room by conducting heat to them directly, by warming air which carries heat by convection, and by reradiating their heat.
Glazing for Solar Gain
Aperture placement and area is an enormous factor in the amount of heat that is gained, at what times of day, and at what seasons of year. For most latitudes, it is optimized by large areas of equator-facing glazing, with the major living spaces exposed directly behind. Shades block excess sun at warmer times and allow the sun’s heat in at cooler times.
Smart orientation, sizing, and shading must be combined with smart selection of glazing properties. Different kinds of glazing can pull the sun’s heat into the interior, or reject it, or let interior heat escape. Several glazing types may be appropriate on different faces of the building.
Avoiding Losses
The same large areas of glazing that let heat in during the day can also readily let heat out at night. Heat can escape through windows both through direct heat transfer, or by allowing long-wave radiation to pass through as interior materials re-radiate their heat. Thus, some form of nighttime protection should be incorporated to minimize any conduction and convection losses through windows. Thick drawn curtains with a closed cornice board or “pelmet” to seal the top can be used, or insulated internal/external roller shutters.
Thermal Mass for Solar Gain
Thermal mass is crucial to comfort with solar heat gain. It absorbs and retains heat, slowing the rate at which the sun heats the space and the rate at which the space loses heat when the sun is gone. Without thermal mass, heat that has entered a space will simply re-radiate back out quickly, making the space overly hot with sunlight and overly cold without.
Surface Color and Cool Roofs
The amount of sunlight absorbed by a material (and thus converted to heat) depends on its color. Light colored surfaces will bounce light around within the space, distributing it over a greater number of surfaces. Dark colored materials will absorb most of the incident energy as soon as it strikes. Both of these can be useful, depending on the situation.
Roofs often need to avoid direct solar gain in hot climates. “Cool roofs” use light colors to reflect most of the sun’s heat. Cool roof surfaces are often far more effective than simply adding roof insulation. For example, the surface of a black roof can easily get 40°C (75°F) hotter than the surface of a white roof on a sunny day.

Dark colored roofs get much hotter than light colored roofs
One common measurement of this is albedo, the ability of the material to reflect sunlight. Light colored roofs have “high albedo.” But the measurement most often used for codes and standards1 is Solar Reflectance Index (SRI), which considers both reflectance and emissivity2.
SRI is a scale where 0 is the least heat-reflective standard black paint (reflectance 0.05, emittance 0.90), and 100 is the most heat-reflective standard white paint (reflectance 0.80, emittance 0.90). This means that it is possible for some materials to have an SRI slightly below zero or slightly above 100.
To be considered a “cool roof” by common standards1 requires an SRI above 78 for flat roofs, and above 29 for steep roofs. Some typical values are below.
| Material surface | SRI |
| Black acrylic paint | 0 |
| Typical asphalt | 6 |
| “White” asphalt shingle | 21 |
| Light gravel-surfaced roof | 37 |
| Typical concrete | 19 – 52 |
| White acrylic paint | 100 |
| Reflective roof membrane | 80 – 110 |
Table of common Solar Reflectance Indexes

Solar Reflectance and absorption vs. heat reflection and emittance, for common materials.
(click to enlarge.) From Sun, Wind, and Light.
Massing & Orientation for Heating
Massing and orientation are important design factors to consider for passive heating. Massing and orientation for passive heating is often helped by extending the east-west axis of buildings to take advantage of the consistent sun on the northern and southern exposures.
Many strategies that are appropriate for daylighting are also effective for passive heating massing and orientation. However, thinner buildings may not be better. It depends on the climate and the program. Some distinctions of massing and orientation for passive heating are:
- First, the amount of sunlight that is optimal for daylighting is often not optimal for solar heat gain.
- Second, since the sun’s heat does not come from all directions like the sun’s light can, walls facing away from the sun’s path get no heat gain, even though they can still get large amounts of diffuse light.
- Third, the sun’s heat can be stored by thermal mass, which the sun’s light cannot. This can be useful for west-facing walls to store heat for the night.
Massing Strategies for Passive Heating
In cold climates, massing that minimizes the ratio of surface area to volume (approaching a cube or hemisphere) can avoid unwanted heat loss. The sun’s heat is advantageous, though, and more surface area facing it can help passively heat the building. The side of the building exposed to the sun’s path can be increased while reducing the exposed areas of the other sides of the building.
In hot climates, thin buildings with their biggest face exposed to the sun can cause unwanted solar heat gain. Shading devices and good windows can be used to reduce this while still allowing natural ventilation. Taller buildings can also reduce unwanted gains in hot climates, as the sun’s heat strikes more strongly on roofs than on walls in warm latitudes, and tall buildings have less roof area per unit volume.
It’s important to remember that the sun’s heat does not come from all directions like the sun’s light can. Walls facing the sun’s path get the most light and the most heat. Windows facing away from the sun’s path can still get large amounts of diffuse light, but without heat gain (and can have excessive heat loss). Windows facing east are warmed in the morning when it is often welcome to break the chill of night, but windows facing west are heated in the afternoon when spaces are generally already warm.

Massing for solar heat gain (orange) can be different from massing for daylighting (yellow).
Orientation Strategies for Passive Heating
Buildings that are longer than they are wide should usually be oriented east-west rather than north-south. This orientation lets you consistently harness thermal gain, or consistently avoid it, along the long face of the building. It also lets you minimize the area that’s subject to faster energy swings from the rising or setting sun. Solar heat gain on the east side can be acceptable or even useful, because it happens in the morning after the cooler night; but solar heat gain on the west side is rarely desirable at the end of an already warm day.
Before determining the materials for the façade, it’s important to understand the patterns of solar radiation that affect the building. The following image shows solar incident radiation throughout the day and throughout the year on the five exposed faces of a cube-shaped building. The vertical axis shows times of day while the horizontal axis shows times of year, and the color shows the amount of incident heat.

Incident solar radiation on different faces of a building through time, in a mid-latitude
The graph shows how thermal heat gain on the east and west sides of buildings change rapidly as the sun moves through the day, while northern and southern exposures are more consistent.
Calculating the Optimum Orientation
The below diagram shows optimum orientation angles for a building, based on solar radiation received in the coldest three months (blue), the warmest three months (red), and over the entire year (green).

The most favorable orientations occur where the amount of incident radiation in winter is greater than the incident in summer, where the blue line extends out beyond the red line.
However, it is also desirable to provide as much protection from the maximum summer radiation as possible. The optimum orientation balances these. Thus, in the graph above, the compromise angle is not exactly at the point of maximum winter collection, but slightly to the east in order to “turn away” slightly from the hot afternoon sun in summer.
Material Choices for OrientationMaterial choices and glazing are part of a building’s orientation for passive. They can avoid unwanted solar heat gain, or unlike daylighting, they can store the sun’s heat with thermal mass. An orientation that supplies just enough daylight may supply too much heat, or vice-versa.
Equator-facing sides of the building are well suited to capture and store the sun’s heat via large windows and materials with high thermal mass, while sides facing away from the sun’s path are not.
To even out temperature swings at sunrise and sunset, east sides may benefit from more window area for direct solar heat gain, while west sides may benefit from smaller window areas and high thermal mass to absorb the heat and release it through the night. The right strategy depends on the climate.

More glazing to the east and more thermal mass to the west can even out temperature swings from the sun’s heat.
In cold climates, sides facing away from the sun’s path will usually benefit from more insulation than sides facing the sun (which means less glazing or higher-insulation glazing), while in hot climates the opposite is true.
Advanced glazing can separate the harvesting of the sun’s light from the sun’s heat. It can also pull in daylight from sides facing away from the sun, without losing too much heat through lack of insulation (low U-value).
Thermal mass is a material’s resistance to change in temperature. Thermal mass is crucial to good passive solar heating design, especially in locations that have large swings of temperature from day to night.

Thermal mass can store energy absorbed from the sun and release it over time. Conversely, it can resist heating up too fast from solar radiation.
Objects with high thermal mass absorb and retain heat, slowing the rate at which the sun heats a space and the rate at which a space loses heat when the sun is gone. Without thermal mass, heat that has entered a space will simply re-radiate back out quickly, making the space overly hot with sunlight and overly cold without.
Thermal mass has virtually no effect in steady-state heat flow, which is when temperatures are relatively constant on each side of a material.
Designing with Thermal Mass
Common architectural implementations of thermal mass storage are concrete floor slabs, water containers, and interior masonry walls such as the back of a chimney. However, many materials can be used.
Climates and Thermal Mass
Thermal mass is most useful in locations that have large swings of temperature from day to night, such as desert climates. Even if the thermal mass does not prevent heat energy from flowing into or out of occupied spaces, like insulation would, it can slow the heat flow so much that it helps people’s comfort rather than causing discomfort.

Thermal mass captures and stores solar heat gain

Thermal mass re-radiates heat after the sun is gone
In climates that are constantly hot or constantly cold, the thermal mass effect can actually be detrimental. This is because all surfaces of the mass will tend towards the average daily temperature; if this temperature is above or below the comfortable range, it will result in even more occupant discomfort due to unwanted radiant gains or losses. Thus, in warm tropical and equatorial climates, buildings tend to be very open and lightweight. In very cold and sub-polar regions, buildings are usually highly insulated with very little exposed thermal mass, even if it is used for structural reasons.
Thermal Mass for Solar Gain
Thermal mass is often critical to direct solar gain passive design.
High thermal mass materials conduct a significant proportion of incoming thermal energy deep into the material. This means that instead of the first couple of millimeters of a wall heating up 5–10 degrees, the entire wall heats up only 1–2 degrees. The material then re-radiates heat at a lower temperature, but re-radiates it for a longer period of time.
This helps occupants stay more comfortable, longer. When the internal temperature of the space falls at night, there is more energy still stored within the walls to be re-radiated back out.
The larger the area of thermal mass receiving direct sunlight, the more heat it receives, so the faster it can heat up, and the more heat it can store.

Insulation prevents thermal gain from leaking into the ground

Insulative coverings can interfere with thermal mass
Thermal Conductivity with Thermal Mass
Insulation can be extremely valuable in preventing direct gain from being conducted to the ground or outside air, where it is lost. In hot climates where direct gain is not desirable, it can even be beneficial for external finishes to have low thermal mass, as well as low conductivity, to increase the effectiveness of insulation.
Thermal lag from mass can greatly reduce the need for insulation in the building envelope, especially in climates with large temperature swings from day to night. Combining thermal mass with insulation can avoid such unwanted temperature swings indoors, while still allowing solar heat gain or radiative cooling.
However, thermally conductive materials can be highly desirable inside a space. They will quickly transfer any heat buildup away from a surface struck by sunlight, deeper into the material, which both stores and evenly distributes the heat within the space. Whereas in less conductive materials, the surface will heat up more where the light strikes, creating a hotspot there while other parts of the space may be cold.
For example, a thick concrete floor will conduct heat and store it relatively evenly throughout the floor (though areas directly struck by the sun will be warmer). However, a wood floor will not distribute heat well, because although wood has high thermal mass, it does not conduct heat well.
Be careful when covering thermal mass with materials such as carpet, cork, wallboard, or other insulating materials. These coverings will isolate the mass from the solar energy you may be trying to collect. Materials such as ceramic floor tiles or brick make better choices for covering a direct gain slab. Tiles should be attached to the slab with a mortar adhesive and grouted with complete contact to the slab–this ensures good heat conduction.
Rules of Thumb for Designing with Thermal Mass
- Choose the right amount of mass. This is determined by how much heat energy the space requires (based on the climate, massing, and program), and the solar income (based on climate, orientation, and surroundings). In general, comfort and performance increase with increase of thermal mass, and there is no upper limit for the amount of well-designed thermal mass.
- Large surface areas of thermal mass, with sufficient solar exposure. A rule of thumb is a mass surface-to-glass area ratio is 6:1.
- In direct gain storage, thin mass is more effective than thick mass. The most effective thickness in masonry materials is the first 100mm. Thicknesses beyond 150mm are usually unhelpful as the heat is simply carried away from the surface and lost. The most effective thickness in wood is the first 25mm.
- Insulating the thermal storage from exterior climate conditions, so that they do not add or remove too much heat. In some climates, however, direct heat gain from sunlight on the envelope and/or direct heat loss to the ground are beneficial.
- It is important to locate as much thermal mass in direct sunlight (heated by radiation) as possible. However, the mass that is located out of the direct sunlight (heated by air convection) is also important for overall performance.
- Thermal mass storage is as much as four times more effective when the mass is both heated directly by the sun and is subject to convective heating from warmed air, compared to being only heated by convection.
- Locating thermal mass in interior partitions is more effective than external walls. Assuming they both have equal solar access, the internal wall heat will transfer heat out of both surfaces whereas the external wall will often lose half to the outside.
- The most effective internal storage wall masses are those located between two direct gain spaces.
- Thermal mass can be combined with glazing to form “Trombe walls”.
Phase-Change Materials
Phase change materials are a relatively new class of materials, which are used to add thermal mass without adding weight or bulk. They may replace standard wall board, or may be an additional layer in walls or floors. They are relatively rare but quickly increasing in popularity as technologies improve and prices drop.
These materials store heat by using the material’s change of phase, usually from solid to liquid and back. It takes a large amount of heat to turn a solid into a liquid, or a liquid into a gas, even without changing the temperature. For instance, it requires 100 calories of energy to heat a gram of water from 0°C to 100°C; however, it takes 539 calories to turn a gram of water at 100°C into a gram of steam at 100°C. When the steam turns back into water, all that heat energy is released.

Graph of heat energy vs. temperature of water as it changes phases
Because of the large amounts of energy needed for phase changes, these materials can radically increase their thermal mass without adding weight or size. For instance, a 1/2″ (1cm) thick sheet of phase-change drywall could have the thermal mass of several inches of concrete.
Most phase change materials use waxes or salts that go from solid to liquid. Some products have pouches of the material like bubble-wrap, but most products have micro-capsules of the material mixed in with ordinary gypsum or concrete.
In addition to compactness and light weight, phase change materials absorb and release their heat at certain temperatures, just as water boils at a certain temperature. This helps occupied spaces stay at the temperature desired, even as heat is flowing in or out of the space.
A Trombe wall is a system for indirect solar heat gain and, although not extremely common, is a good example of thermal mass, solar gain, and glazing properties used together to achieve human comfort goals passively.
It consists of a dark colored wall of high thermal mass facing the sun, with glazing spaced in front to leave a small air space. The glazing traps solar radiation like a small greenhouse. An attached sunspace is essentially a Trombe wall where the air space is so big it is habitable.

A Trombe wall (left) and attached sunspace (right)
Trombe walls are a very useful passive heating system. They require little or no effort to operate, and are ideal for spaces where silence and privacy are desirable. Sunspaces are equally simple and silent, and can allow views. Rooms heated by a Trombe wall or sunspace often feel more comfortable than those heated by forced-air systems, even at lower air temperatures, because of the radiantly warm surface of the wall.
A successful Trombe wall or attached sunspace optimizes heat gain and minimizes heat loss during cold times, and avoids excess heat gain in hot times.
Trombe Walls
Trombe walls are thermal storage walls, named after the French inventor Felix Trombe. A typical Trombe wall consists of a 20 – 40cm (8″ – 16″) thick masonry wall painted a dark, heat-absorbing color and faced with a single or double layer of glass. The glass is placed between 2 – 15cm (1″ – 6″) away from the masonry wall to create a small airspace. Heat from sunlight passing through the glass is absorbed by the dark surface, stored in the wall, and conducted slowly inward through the masonry.
The glass prevents the escape of radiant heat from the warm surface of the storage wall. The heat radiated by the wall is therefore trapped within the air gap, further heating the wall surface. For a 40cm (16″) thick Trombe wall, heat will take about 8 to 10 hours to reach the interior of the building. This means that the room behind remains comfortable through the day and receives slow, even heating for many hours after the sun sets. Such designs are ideal for use in residential living areas and bedrooms.
In addition to radiant heat, you can also configure Trombe walls to heat air within the internal space. Including upper and lower air vents in the wall allows convection currents, as cooler air from the room enters at the bottom and air heated in the Trombe wall escapes into the room at the top. These vents must be operable to prevent reverse convention currents occurring at night, which would cool the occupied space. Operable vents also allow the occupants control over instantaneous heating.

A vented Trombe wall heats air convectively as well as heating the space radiatively.

Vents can be shut at night to keep the convection loop moving the right direction.
Avoiding Losses
Using low-E glazing can prevent heat from re-radiating out through the glass of a Trombe wall and greatly reduce the amount of heat lost. Applying a spectrally selective surface or low-E coating to the wall itself can also improve performance by reducing the amount of infrared energy radiated towards the glass.

Low-E glazing reflecting heat back into the Trombe wall
Adapting to Day & Season
To avoid overheating at hot times of day or hot seasons of the year, architects can use Trombe walls in conjunction with overhangs, eaves, and other building design elements to evenly balance solar heat delivery.

A Trombe wall with overhang to shade from summer sun
Ideally, the glazing should have exterior insulating shutters for nighttime use in order to prevent the heat gained from being returned back to the outside.
While even seasonally-adapting Trombe walls can have no moving parts, you should provide for some method of cleaning the internal area between the glazing and the storage portion of a Trombe wall.
Sunspaces
Attached sunspaces (also called “conservatories”) work much like vented Trombe walls. They can heat spaces both through radiation and convection. The difference is that the space between the glass and the thermal mass creates a habitable space.

A sunspace with vents for convective heating as well as radiative heating

The same sunspace at night, with vents closed, to keep convection going the proper direction
Sunspaces are primarily used for indirect solar heat gain and generally have more glazing area than floor area. Nighttime heat loss is not as critical in a sunspace as in direct gain systems, since the room can be closed off from the rest of the building. However, night insulation or double-glazing is recommended if the sunspace serves as living space after sundown.
Designing Sunspaces
Important considerations for sunspace design are:
- In very cold climates, double glazing reduces conductive losses through the glass to the outside.
- Insulated panels, shades, or blinds are more important for sunspaces than for Trombe walls, as sunspaces are sometimes occupied.
- As with Trombe walls, the darker the internal surfaces of the sunspace, the more effectively the thermal mass can store heat during the day.
- Do not overpopulate conservatories with vegetation, as foliage can reduce the system’s heat capture by significantly shading the floor and wall.
- For all climates except those with very cool summers, operable or mechanized windows should be considered at top and bottom. These allow the sun space to avoid overheating by passively venting hot air out the top of the glazing and pulling cool air in through the bottom of the glazing.
Variations
Water Walls
Instead of using masonry, water can be used as the thermal mass of a Trombe wall or sunspace. Due to convection currents within the water itself, heat is transferred through the entire thermal mass much quicker than a masonry wall that relies solely on conduction. This can be useful when a shorter delay in heat delivery is required.
Such systems can not only bring heat into a space, they can be translucent to bring light in as well. When using a water Trombe wall, it is better to seal the air between the glass and wall, to further increase the surface temperature of the wall.

Barrels of water for thermal mass
Solar chimney
During hot seasons, a Trombe wall or sunspace with vents through it can be used as a thermosiphon. If vents are placed at the top of the glazing, then air from the room will be pulled out by convection in the air gap between glazing and mass wall. This form of passive ventilation is called a solar chimney.
 A Trombe wall acting as a solar chimney
Apertures for Heating
Windows and other apertures bring in heat from sunshine, but can also lose heat by radiant cooling and by conducting heat better than most wall or roof constructions. Apertures and shading must be intelligently placed to take advantage of the sun’s heat in cold locations and seasons, while not overheating in hot seasons.
Placement matters for heating and cooling in much the same way it matters for daylighting. Openings facing towards the sun’s path or on top of the building can pull in large amounts of heat – usually more than east or west apertures.
As with daylighting, glazing with the right properties must be chosen for the right orientations. For example, a window that lets in plenty of useful heat when located in one side of the building might allow terrible heat loss if located in another side.
However, there are some differences to consider when designing apertures for passive heating. Apertures facing away from the sun’s path usually lose heat to the outside. In many climates, east windows can be desirable to warm spaces early in the day after a cold night. In warmer climates, west-facing windows can be especially prone to overheating.
Passive solar heating usually combines solar heat gain with thermal mass inside the building, to capture and store the sun’s heat for slow release through the night.
Shades can keep the heat and glare of direct sun from coming through windows. They can also keep direct sunlight off of walls or roofs, to reduce cooling loads.

Interior shades can improve visual comfort, but do not block out solar heat gain
The most common form of shade is an exterior fixed horizontal overhang. These are used on the side of the building facing the sun’s path, sometimes including east and west faces. However, east and west faces often have more need of vertical fins to avoid low-angled sun.
The side of the building facing away from the equator needs no shading, except near the equator where the sun may be on the north or south side depending on the season.
There are many variations on fixed external shades, to reduce the profile and/or let more diffuse light in.

In hot climates, it can be especially useful to shade the building’s roof to avoid solar heat gain. Rooftop solar panels, if placed right, can act as shades and thus perform double duty as energy generators and energy load reducers.
Adaptive Shades
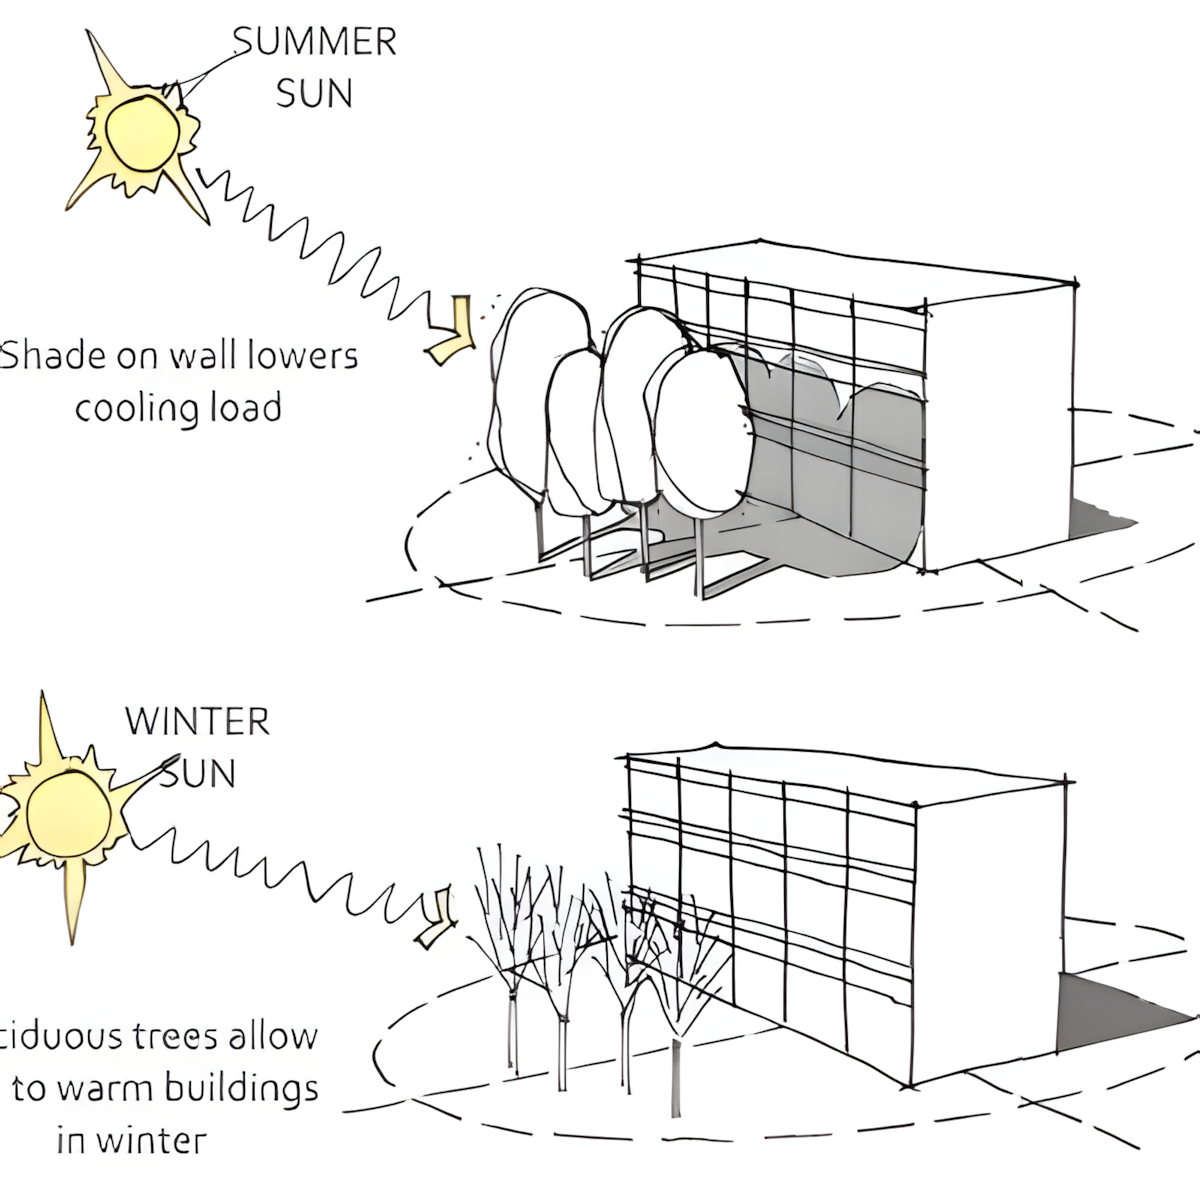
Shading can be designed to allow the sun’s light and heat into the building at some times of day or year, while rejecting it at other times. The simplest method for this is to use a fixed horizontal overhang whose width is calculated to shade during summer months when the sun is high, and allow the sunlight in during winter months when the sun is at a lower angle.

An overhang shades in summer but lets heat in during winter
You can visualize the sizes for such overhangs for your location with this shading angle tool.
Shading can also be adapted by making it movable–either manually operated by occupants or automatically controlled. Such systems can be much more responsive and finely tuned, but they are also more expensive, and require more maintenance and repair over the years. User-operated systems may require occupant training, and are often not properly used.
Passive Cooling
Just like passive heating, cooling your building using passive strategies is important for reducing energy usage in your building. Specifically, utilizing passive cooling strategies like natural ventilation, air cooling, and shades can reduce your demand for mechanical cooling while maintaining thermal comfort.
For more information on shading design, see the Shading Design page in the building envelope section.
Natural Ventilation
Natural ventilation, also called passive ventilation, uses natural outside air movement and pressure differences to both passively cool and ventilate a building.
Natural ventilation is important because it can provide and move fresh air without fans. For warm and hot climates, it can help meet a building’s cooling loads without using mechanical air conditioning systems. This can be a large fraction of a building’s total energy use.
Successful natural ventilation is determined by having high thermal comfort and adequate fresh air for the ventilated spaces, while having little or no energy use for active HVAC cooling and ventilation.
You can choose the right strategy based on the temperature and humidity of your site. The following chart shows how much these different strategies can extend the comfortable climate range for people.

Different passive cooling strategies can keep people comfortable at different ranges of outside temperature and humidity.
When not to use natural ventilation
Sites with high levels of acoustic noise, such as near heavy traffic zones, may be less suitable for natural ventilation because large openings in the building envelope can make it difficult to block outside noise. This can sometimes be solved by using acoustical ventilation louvers.
Also, sites with poor air quality, such as adjacent to busy freeways, may also be less desirable for natural ventilation. Such sites may overcome poor outdoor air quality with filters and ducting, though this usually requires some mechanical fan systems.
To measure the effectiveness of your ventilation strategies, you can measure both the volume and speed of the airflow.
The volume of the airflow is important because it dictates the rate at which stale air can be replaced by fresh air, and determines how much heat the space gains or losses as a result. The volume of airflow due to wind is:
Q_wind = K • A • V
The coefficient of effectiveness is a number from 0 to 1, adjusting for the angle of the wind and other fluid dynamics factors, such as the relative size of inlet and outlet openings. Wind hitting an open window at a 45° angle of incidence would have a coefficient of effectiveness of roughly 0.4, while wind hitting an open window directly at a 90° angle would have a coefficient of roughly 0.8.
When placing ventilation openings, you need to place both air inlets and air outlets; often they do not have the same area. The opening area used in this equation is the smaller of the two.
Air Speed and Temperature in Buildings
In addition to volume, you should design for the wind speed inside your building. Wind speed is a component of human comfort, and the speed you want depends on the climate.
Higher velocity air causes more effective cooling, because it pulls heated air away faster, and because it helps sweating be more effective by evaporating it faster. Even a moderate wind speed can cool perceived temperatures 5°C (9°F) compared to still air. This is how fans make people feel cooler even though they do not change the temperature of the air.
However, the ability of air movement to cool people depends on whether it is the air itself that is hot, or if the radiant temperatures of the room’s surfaces are hot. The hotter the air itself is, the less it helps to move it. If people are primarily hot from surrounding radiant temperatures, however, moving air helps more. The ASHRAE 55 standard provides guidelines for how much cooling is possible with air movement at different speeds, for different mean radiant temperatures. A 3°C temperature rise can be nullified by a 0.8 m/s increase in air speed when air temperatures are 5°C below radiant temperatures, but if air temperatures are 5°C warmer than radiant temperature, it would require a 1.6 m/s increase in air speed. This is far above what is acceptable wind conditions for light office work.

Comfortable air temperature vs. wind speed depends on mean radiant temperature
You’ll need to make sure that wind speeds inside the building aren’t so high that they disturb the occupants. Fast winds can blow papers around on desks, blow people’s hair around, etc (refer back to the Beaufort Wind Scale). Referring to ASHRAE 55 for thermal comfort guidelines regarding air speeds for interior spaces, the standard suggests that air speeds appropriate for indoor environments do not exceed 0.2 m/s or 0.447 mph. ASHRAE also accounts for elevated air speeds that will increase the acceptable temperature. The maximum allowable elevated airspeed is 1.5 m/s or 3.579 mph.
It is also important to consider how often the air in a room is replaced, as an important feature of natural ventilation is that it supplies occupants with fresh air. The number of times the air in a room is replaced is known as air changes per hour, ACH, or the air change rate. It is determined by both the size of the room and the volumetric flowrate of air (Q). Q_wind, referenced above, is a component of this overall flow rate.
There are standards and recommendations for how much fresh outside air should be delivered to different building spaces, and to people within the building. For example, ASHRAE 62.2001 specifies 0.35 air changes per hour for residential living areas, but also specifies a minimum volumetric flowrate of 15 ft3/min (CFM) per person.
The equation is:
ACH = (Q / V) * (conversion factor)
Q = volumetric flow rate of fresh air
V = Volume of room or space
Conversion Factor = If the volumetric flow rate, time scales, and volumes are incongruous units. For example, if Q is in cubic feet per minute (CFM) and volume is in ft2, you’d need to multiply by 60 to get it in terms of hours. If Q is in cubic meters per second, or Liters per second, the conversion factor would be different.
Thermal Mass
Thermal mass can also have an impact on natural ventilation. Sometimes a space can get too hot for natural ventilation to have an impact on thermal comfort. However, you can use thermal mass to help maintain a consistent temperature and avoid big jumps. By stabilizing the temperature swings, you have a better chance of using natural ventilation effectively. Best practice design strategies for enhancing natural ventilation with thermal mass is explained further through night purging.
Wind ventilation is a kind of passive ventilation that uses the force of the wind to pull air through the building.
Wind ventilation is the easiest, most common, and often least expensive form of passive cooling and ventilation. Successful wind ventilation is determined by having high thermal comfort and adequate fresh air for the ventilated spaces, while having little or no energy use for active HVAC cooling and ventilation.

Using the wind for passive cooling and fresh air
Strategies for wind ventilation include operable windows, ventilation louvers, and rooftop vents, as well as structures to aim or funnel breezes. Windows are the most common tool. Advanced systems can have automated windows or louvers actuated by thermostats.
If air moves through openings that are intentional as a result of wind ventilation, then the building has natural ventilation. If air moves through openings that are not intentional as a result of wind ventilation, then the building has infiltration, or unwanted ventilation (air leaking in).
Strategies for Wind Ventilation
The keys to good wind ventilation design are the building orientation and massing, as well as sizing and placing openings appropriately for the climate. In order to maximize wind ventilation, you’ll want the pressure difference between the windward (inlet) and leeward (outlet) to be maximized. In almost all cases, high pressures occur on the windward side of a building and low pressures occur on the leeward side.The local climate may have strong prevailing winds in a certain direction, or light variable breezes, or may have very different wind conditions at different times. Often a great deal of adjustability by occupants is required. Consult climate data for wind rose diagrams.The local climate may also have very hot times of the day or year, while other times are quite cold (particularly desert regions). In summer, wind is usually used to supply as much fresh air as possible while in winter, wind ventilation is normally reduced to levels sufficient only to remove excess moisture and pollutants.
Site, Massing, and Orientation for Wind Ventilation
Massing and orientation are important because building height and depth play a huge role in the structure’s ability to effectively pull outside air through occupied spaces. The massing and orientation pages discuss how to optimize them for passive ventilation. In a nutshell, upper floors and roofs are exposed to more wind than lower floors, and buildings with thin profiles facing into the path of prevailing winds are easiest to ventilate. Atria and open-plan spaces also help wind ventilation be more effective.
Cross Ventilation
When placing ventilation openings, you are placing inlets and outlets to optimize the path air follows through the building. Windows or vents placed on opposite sides of the building give natural breezes a pathway through the structure. This is called cross-ventilation. Cross-ventilation is generally the most effective form of wind ventilation.

Cross-ventilation (bottom images) is more effective
than ventilation that does not pass through the whole space (top images)
(Image from Sun, Wind, and Light, by G.Z. Brown and Mark DeKay, published by Wiley)
It is generally best not to place openings exactly across from each other in a space. While this does give effective ventilation, it can cause some parts of the room to be well-cooled and ventilated while other parts are not. Placing openings across from, but not directly opposite, each other causes the room’s air to mix, better distributing the cooling and fresh air.Also, you can increase cross ventilation by having larger openings on the leeward faces of the building that the windward faces and placing inlets at higher pressure zones and outlets at lower pressure zones.

Different amounts of ventilation and air mixing with different windows open
Placing inlets low in the room and outlets high in the room can cool spaces more effectively because they leverage the natural convection of air. Cooler air sinks lower, while hot air rises; therefore, locating the opening down low helps push cooler air through the space, while locating the exhaust up high helps pull warmer air out of the space.This strategy is covered more on the stack ventilation page.

Opening height affects passive ventilation
(Image adapted from Sun, Wind, and Light, by G.Z. Brown and Mark DeKay, published by Wiley)
Steering Breezes
Not all parts of buildings can be oriented for cross-ventilation. But wind can be steered by architectural features, such as casement windows, wing walls, fences, or even strategically-planted vegetation.
Architectural features can scoop air into a room. Such structures facing opposite directions on opposite walls can heighten this effect. These features can range from casement windows or baffles to large-scale structures such as fences, walls, or hedgerows.

Building structures can redirect prevailing winds to cross-ventilation
Wing Walls
Wing walls project outward next to a window, so that even a slight breeze against the wall creates a high pressure zone on one side and low on the other. The pressure differential draws outdoor air in through one open window and out the adjacent one. Wing walls are especially effective on sites with low outdoor air velocity and variable wind directions.

Different wing walls of better and worse effectiveness, on same wall and adjacent walls.
(Image from Sun, Wind, and Light, p. 184 by G.Z. Brown and Mark DeKay, published by Wiley)
Stack ventilation and Bernoulli’s principle are two kinds of passive ventilation that use air pressure differences due to height to pull air through the building. Lower pressures higher in the building help pull air upward. The difference between stack ventilation and Bernoulli’s principle is where the pressure difference comes from.

Lower air pressures at higher heights can passively pull air through a building.
Stack ventilation uses temperature differences to move air. Hot air rises because it is lower pressure. For this reason, it is sometimes called buoyancy ventilation.

The stack effect: hot air rises due to buoyancy, and its low pressure sucks in fresh air from outside
(Image from Sun, Wind, and Light, by G.Z. Brown and Mark DeKay, published by Wiley)
Bernoulli’s principle uses wind speed differences to move air. It is a general principle of fluid dynamics, saying that the faster air moves, the lower its pressure. Architecturally speaking, outdoor air farther from the ground is less obstructed, so it moves faster than lower air, and thus has lower pressure. This lower pressure can help suck fresh air through the building. A building’s surroundings can greatly affect this strategy, by causing more or less obstruction.
The advantage of Bernoulli’s principle over the stack effect is that it multiplies the effectiveness of wind ventilation. The advantage of stack ventilation over Bernoulli’s principle is that it does not need wind: it works just as well on still, breezeless days when it may be most needed. In many cases, designing for one effectively designs for both, but some strategies can be employed to emphasize one or the other. For instance, a simple chimney optimizes for the stack effect, while wind scoops optimize for Bernoulli’s principle.
For example, the specially-designed wind cowls in the BedZED development use the faster winds above rooftops for passive ventilation. They have both intake and outlet, so that fast rooftop winds get scooped into the buildings, and the larger outlets create lower pressures to naturally suck air out. The stack effect also helps pull air out through the same exhaust vent.

Special wind cowls in the BedZED development use the faster winds above rooftops for passive ventilation
After wind ventilation, stack ventilation is the most commonly used form of passive ventilation. It and Bernoulli’s principle can be extremely effective and inexpensive to implement. Typically, at night, wind speeds are slower, so ventilation strategies driven by wind is less effective. Therefore, stack ventilation is an important strategy.
Successful passive ventilation using these strategies is measured by having high thermal comfort and adequate fresh air for the ventilated spaces, while having little or no energy use for active HVAC cooling and ventilation.
Strategies for Stack Ventilation and Bernoulli’s Principle
Designing for stack ventilation and Bernoulli’s principle are similar, and a structure built for one will generally have both phenomena at work. In both strategies, cool air is sucked in through low inlet openings and hotter exhaust air escapes through high outlet openings. The ventilation rate is proportional to the area of the openings. Placing openings at the bottom and top of an open space will encourage natural ventilation through stack effect. The warm air will exhaust through the top openings, resulting in cooler air being pulled into the building from the outside through the openings at the bottom. Openings at the top and bottom should be roughly the same size to encourage even air flow through the vertical space.
To design for these effects, the most important consideration is to have a large difference in height between air inlets and outlets. The bigger the difference, the better.
Towers and chimneys can be useful to carry air up and out, or skylights or clerestories in more modest buildings. For these strategies to work, air must be able to flow between levels. Multi-story buildings should have vertical atria or shafts connecting the airflows of different floors.

Chimneys / atria with vents at top and bottom
Solar radiation can be used to enhance stack ventilation in tall open spaces. By allowing solar radiation into the space (by using equator facing glazing for example), you can heat up the interior surfaces and increase the temperature which will accelerate stack ventilation between the top and bottom openings.
Installing weatherproof vents to passively ventilate attic spaces in hot climates is an important design strategy that is often overlooked. In addition to simply preventing overheating1, ventilated attics can use these principles to actually help cool a building. There are several styles of passive roof vents: Open stack, turbine, gable, and ridge vents, to name a few.

Some roof vents: open stack, turbine, and gable vents
To allow adjustability in the amount of cooling and fresh air provided by stack ventilation and Bernoulli systems, the inlet openings should be adjustable with operable windows or ventilation louvers. Such systems can be mechanized and controlled by thermostats to optimize performance.
Stack ventilation and the Bernoulli effect can be combined with cross-ventilation as well. This matrix shows how multiple different horizontal and vertical air pathways can be combined.

Combining horizontal and vertical air pathways
(Image from Sun, Wind, and Light, by G.Z. Brown and Mark DeKay, published by Wiley)
Solar Chimneys
A solar chimney uses the sun’s heat to provide cooling, using the stack effect. Solar heat gain warms a column of air, which then rises, pulling new outside air through the building. They are also called thermal chimneys, thermosiphons, or thermosyphons.

Different solar chimney designs, from a simple black-painted pipe to integrated Trombe roof structure
The simplest solar chimney is merely a chimney painted black. Many outhouses in parks use such chimneys to provide passive ventilation. Solar chimneys need their exhaust higher than roof level, and need generous sun exposure. They are generally most effective for climates with a lot of sun and little wind; climates with more wind on hot days can usually get more ventilation using the wind itself.

Solar chimney in a park outhouse
Advanced solar chimneys can involve Trombe walls or other means of absorbing and storing heat in the chimney to maximize the sun’s effect, and keep it working after sunset. Unlike a Trombe wall, solar chimneys are generally best when insulated from occupied spaces, so they do not transfer the sun’s heat to those spaces but only provide cooling.

Solar chimney compared to a Trombe wall
Thermal chimneys can also be combined with means of cooling the incoming air, such as evaporative cooling or geothermal cooling.
Solar chimneys can also be used for heating, much like a Trombe wall is. If the top exterior vents are closed, the heated air is not exhausted out the top; at the same time, if high interior vents are opened to let the heated air into occupied spaces, it will provide convective air heating.


Solar chimneys can either heat or cool a space
This works even on cold and relatively cloudy days. It can be useful for locations with hot summers and cold winters, switching between cooling and heating by adjusting which vents are open and closed.
In very hot climates it’s often necessary to prevent outdoor air from getting into the building un-conditioned during the heat of the day. However, natural ventilation can still be an option even in hot climates, particularly in hot dry climates. Two techniques can be used: faster air movement, and passively cooling incoming air.
Faster air movement on people’s skin helps because it encourages evaporation of sweat, making them feel cooler at higher temperatures than normal.
Passively cooling incoming air before it is drawn into the building can be achieved by evaporative cooling and/or geothermal cooling.
Evaporative Cooling
If the inlet air is taken from the side of the building facing away from the sun, and is drawn over a cooling pond or spray of mist or through large areas of vegetation, it can end up several degrees cooler than outside air temperature by the time it enters occupied spaces.

A courtyard fountain in the Alhambra cools air before it enters the building
Geothermal Cooling
Inlet air can also be cooled by drawing it through underground pipes or through an underground plenum (air space). The air loses some of its heat to the surfaces over which it passes. Underground, these surfaces tend to be at roughly the annual average temperature, providing cooling in summer and warming in winter. This strategy is best for dry climates, as moisture in dark cool places can lead to poor indoor air quality.
Many early versions of geothermal cooling used rock stores or gravel beds for their thermal storage capacity; however, the additional resistance to air flow was quite high, often requiring a powered fan or pump. Large open plenums can provide almost as much cooling or warming with only minimal obstruction.
Massing Strategies for Passive Cooling
Thinner buildings increase the ratio of surface area to volume. This will make utilizing natural ventilation for passive cooling easy. Conversely, a deep floor plan will make natural ventilation difficult – especially getting air into the core of the building – and may require mechanical ventilation.
Tall buildings also increase the effectiveness of natural ventilation, because wind speeds are faster at greater heights. This improves not only cross ventilation but also stack effect ventilation.

Tall buildings improve natural ventilation, and in lower latitudes reduce sun exposure.
While thin and tall buildings can improve the effectiveness of natural ventilation to cool buildings, they also increase the exposed area for heat transfer through the building envelope. Sometimes this is good, sometimes not. See Massing & Orientation for Passive Heating.
When planning urban centers, specifically in heating dominated climates, having the buildings gradually increase in height will minimize high speed winds at the pedestrian level which can influence thermal comfort. The height difference between neighboring buildings should not exceed 100%.
Orientation Strategies for Passive Cooling
Buildings should be oriented to maximize benefits from cooling breezes in hot weather and shelter from undesirable winds in cold weather. Look at the prevailing winds for your site throughout the year, using a wind rose diagram, to see which winds to take advantage of or avoid.

Wind-rose diagram, showing statistics of wind speed and direction throughout the year
Generally, orienting the building so that its shorter axis aligns with prevailing winds will provide the most wind ventilation, while orienting it perpendicular to prevailing winds will provide the least passive ventilation.

Orientation for maximum passive ventilation
The effectiveness of this strategy and aperture placement can be estimated. Here are some rules of thumb for two scenarios in which windows are facing the direction of the prevailing wind:
- For spaces with windows on only one side, natural ventilation will not reach farther than two times the floor to ceiling height into the building.
- For spaces with windows on opposite sides, the natural ventilation effectiveness limit will be less than five times the floor to ceiling height into the building.
However, buildings do not have to face directly into the wind to achieve good cross-ventilation. Internal spaces and structural elements can be designed to channel air through the building in different directions. In addition, the prevailing wind directions listed by weather data may not be the actual prevailing wind directions, depending on local site obstructions, such as trees or other buildings.
For buildings that feature a courtyard and are located in climates where cooling is desired, orienting the courtyard 45 degrees from the prevailing wind maximizes wind in the courtyard and cross ventilation through the building.
Apertures for Cooling
The simple act of opening a window can often provide immediate cooling effects. But how do the size and placement of that window impact the effect you feel? Window design and ventilation louver design greatly affects passive cooling potential, specifically natural ventilation. Be sure to visit the wind, stack, and night-purge ventilation pages to learn more about more specific opening strategies.
Opening Shape
Opening shape matters and can influence airflow effectiveness. Long horizontal strip windows can ventilate a space more evenly. Tall windows with openings at top and bottom can use convection as well as outside breezes to pull hot air out the top of the room while supplying cool air at the bottom.
Opening Size
Window or louver size can affect both the amount of air and its speed. For an adequate amount of air, one rule of thumb states that the area of operable windows or louvers should be 20% or more of the floor area, with the area of inlet openings roughly matching the area of outlets.
However, to increase cooling effectiveness, a smaller inlet can be paired with a larger outlet opening. With this configuration, inlet air can have a higher velocity. Because the same amount of air must pass through both the bigger and smaller openings in the same period of time, it must pass through the smaller opening more quickly.

Pairing a large outlet with a small inlet increases incoming wind speed.
Note that a small air inlet and large outlet does not increase the amount of fresh air per minute any more than large openings on both sides would; it only increases the incoming air velocity. Basic physics says that air cannot be created or destroyed as it moves through the building, so in order for the same amount of air to pass through a smaller opening, it must be moving faster.
Air flows from areas of high pressure to low pressure. Air can be steered by producing localized areas of high or low pressure. Anything that changes the air’s path will impede its flow, causing slightly higher air pressure on the windward side of the building and a negative pressure on the leeward side. To equalize this pressure, outside air will enter any windward openings and be drawn out of leeward openings.
Because of pressure differences at different altitudes, this impedance to airflow is significantly higher if the air is forced to move upward or downward to navigate a barrier without any corresponding increase or decrease in temperature.
Opening Types
Windows that only open halfway, such as double-hung and sliding windows, are only half as effective for ventilation as they are for daylight. Some casement windows and Jalousie windows, however, can open so wide that effectively their entire area is useful for ventilation.
Casement windows can deflect breezes, or can act as a scoop to bring them in, depending on wind direction. Jalousie windows (horizontal louvered glazing) can catch breezes while keeping out rain.

Some window types: double-hung, jalousie, and casement
You can also use ventilation louvers instead of windows for your openings. Their coefficients of effectiveness will be the same as windows of the same geometry, such as Jalousie windows. Ventilation louvers often open so wide that nearly all their area is useful for ventilation. They are typically oriented horizontally to prevent rain from entering; this is an advantage over most windows. Ventilation louvers also provide visual privacy, and can even provide acoustic damping.
You can also use ventilation louvers instead of windows for your openings. Their coefficients of effectiveness will be the same as windows of the same geometry, such as Jalousie windows. Ventilation louvers often open so wide that nearly all their area is useful for ventilation. They are typically oriented horizontally to prevent rain from entering; this is an advantage over most windows. Ventilation louvers also provide visual privacy, and can even provide acoustic damping.

Mechanized and acoustically-damping ventilation louvers
Lighting and Daylighting Design
Fundamentals of Light
Visual comfort is measured by illumination levels and distribution. This includes not only the brightness of light sources, but also the colors in the light, and how well light is spread around spaces. The goal is to illuminate tasks without using too much energy or causing glare. Good lighting design achieves visual comfort by modeling and simulating daylight and artificial light.
Measuring Light Levels
To design for visual comfort, you need to know how to measure light. The measurement and perception of light can be an in-depth topic, and effectively analyzing daylight requires being precise with the terms and metrics used.
Basic Metrics

Luminous Flux and Intensity = Light Coming from a Source
The amount of light being given off by a particular source, in all directions, is called luminous flux (or “luminous power”) and is a measure of the total perceived power of light. It is measured in lumens. Lumens are a useful metric for comparing how bright a light source is (i.e. a 60W incandescent bulb is about 850 lumens – see Electric Light Sources for more about lighting efficiency).
The amount of light falling on a surface is “illuminance”, and is measured in lux (metric unit = lumen/m2) or foot-candles (English unit = lumen/ft2). 1 footcandle equals 10.8 lux. This is the measurement you’ll work with the most for optimizing visual comfort because building regulations and standards use illuminance to specify the minimum light levels for specific tasks and environments.
This value does not depend on the material properties of the surface being illuminated. However, since the amount of light the surface “sees” depends on how much is being reflected from other surfaces around it, it does depend on the color and reflectance of the surfaces that surround it.
The brightness of the sky is often given using illuminance values measured on an unobstructed horizontal plane. Some common illumination levels are in the table below, from The Engineering Toolbox:
| Condition | Illumination | |
| (ftcd) | (lux) | |
| Full Daylight | 1,000 | 10,752 |
| Overcast Day | 100 | 1,075 |
| Very Dark Day | 10 | 107 |
| Twilight | 1 | 10.8 |
| Deep Twilight | 0.1 | 1.08 |
| Full Moon | 0.01 | 0.108 |
| Quarter Moon | 0.001 | 0.0108 |
| Starlight | 0.0001 | 0.0011 |
Comfortable Illumination Levels
The values above represent the total illumination available from the sky. As a designer, your job is to make sure that the occupants of your building have the right level of light for their activity, and try to get as much of that light as possible from natural light. These levels are usually measured on a working surface in the building.
Areas can be too dim or too bright, and these levels depend on the task. The brightness required to make jewelry or assemble electronic components is far greater than the brightness required to safely walk to a room’s exit. The following is a table of commonly recommended light levels for different activities. To design for the activities in your program, see local codes or green building certification standards.
| Standard Maintained Illuminance (lux) | Foot-candles | Characteristics of Activity | Representative Activity |
| 50 | 5 | Interiors rarely used for visual tasks (no perception of detail) | Cable tunnels, nighttime sidewalk, parking lots |
| 100 – 150 | 10-15 | Interiors with minimal demand for visual acuity (limited perception of detail) | Corridors, changing rooms, loading bay |
| 200 | 20 | Interiors with low demand for visual acuity (some perception of detail) | Foyers and entrances, dining rooms, warehouses, restrooms |
| 300 | 30 | Interior with some demand for visual acuity (frequently occupied spaces) | Libraries, sports and assembly halls, teaching spaces, lecture theaters |
| 500 | 50 | Interior with moderate demand for visual acuity (some low contrast, color judgment tasks) | Computer work, reading & writing, general offices, retail shops, kitchens |
| 750 | 75 | Interior with demand for good visual acuity (good color judgment, inviting interior) | Drawing offices, chain stores, general electronics work |
| 1000 | 100 | Interior with demand for superior visual acuity
(accurate color judgment & low contrast) |
Detailed electronics assembly, drafting, cabinet making, supermarkets |
| 1500 -2000+ | 150-200+ | Interior with demand for maximum visual acuity (low contrast, optical aids & local lighting will be of advantage) | Hand tailoring, precision assembly, detailed drafting, assembly of minute mechanisms |
Recommended illuminance levels for different tasks.
Measuring Illuminance in Software
With various available lighting analysis software, you can see the actual value of useful light falling on critical surfaces like desks, walls and walking surfaces. Depending on the levels of illuminance required for a particular use or activity, you can use these quantitative renderings to understand whether the space is useful or if the design needs more attention.


during the day and during the night. Image from Loisos + Ubbelohde.

Luminance = Light Reflected by a Surface
Luminance is the light reflected off of surfaces and measured in candelas per square meter (cd/m2), or Nits (in imperial units).
Luminance is what we perceive when looking at a scene, or when using a camera. The quality and intensity of the light that reaches our eye does depend on the material properties of the surfaces (color, reflectance, texture).
Luminance values are often used to study the visual quality of a space. Visual software renderings (i.e. 3ds Max) are based on this and can give designers a very good idea of how the space will look based on their choices of light sources and materials.
While luminance is really useful for understanding qualitative measures of the success of a design, it is not a good measure of light quantity. Because the human eye can adjust for a huge range of illumination levels over 3-4 orders of magnitude, from bright daylight in the 10’s of thousands of lux (1000’s of fc), to mere 10’s of lux (single-digit fc), a visual rendering of a bright and a not-so-bright space are difficult to measure. Can you tell by looking at the visual renderings that there is over 100 times more light intensity on the wall in the day image than in the night image?


(Left) Visual Rendering – Daytime. (Right) Visual Rendering – Nighttime.
Luminance renderings are useful for understanding qualities like light distribution and glare, but not for understanding if the space has enough light for its intended use. Glare is determined by comparing the extremes of luminance values that an occupant’s eye will see from a given vantage point.
Measures Used in Daylighting Design
Based on these measures, lighting designers use some additional metrics like daylight factor and daylight autonomy to help them optimize and communicate the quantity and quality of daylight within a space. This is important because the availability of daylight can change a lot throughout the day based on sky conditions.
Daylight Factor
The actual illuminance levels in the space from daylighting can vary greatly due to the cloud cover and position of the sun. To deal with these highly variable sky conditions, some building codes and design briefs use daylight factors as the design criteria instead of illuminance on the working plane.
Daylight factors are expressed as the percentage of natural light falling on a work surface compared to that which would have fallen on a completely unobstructed horizontal surface under same sky conditions. The daylight factor is analyzed at a point, but these values are often averaged across an entire room or visualized on a grid.
A daylight factor of 5% on an internal surface means that it received 1/20th of the maximum available natural light.

For reference, a room that has a DF of less than 2% is considered poorly lit. Rooms with DF between 2% and 5% are considered ideal for activities that commonly occur indoors. With daylight factors of more than 5%, it is important to take into account thermal requirements (see human thermal comfort) because large areas of glazing can result in heat loss during the winter and overheating in the summer.
Daylight factors are generally calculated using a standard overcast sky in order to represent a worst-case scenario to be designed for (see Sky Conditions, above). The distribution of light in an overcast sky dome is assumed to consist of uniform horizontal bands that get brighter at the top (or higher solar altitude). Due to this uniform sky, and the fact that the daylight factor is calculated as a percentage, the only parameters that affect daylight factors are the geometry of the room design and the materials it is made of. It won’t depend on building orientation or location.
Daylight Autonomy (DA) and Useful Daylight Illuminances (UDI)
Daylight Autonomy (DA) is the percentage of working hours when lighting needs are met by daylight alone. It is measured by comparing daylight illuminance on a workplane to the minimum requirement over time. This is a very popular metric and can tell you how often lights need to be on to meet specific illumination requirements.
Useful Daylight Illuminances (UDI) also measures a percentage of time that a space receives adequate daylight, but it also quantifies when the light levels are too high and too low. UDI is based on three standard bins (which broadly line-up with comfortable illumination levels cited above).
- Less than 100lux is insufficient daylight
- Between 100 lux and 2000 lux is useful daylight
- More than 2000 lux is too much daylight and can result in visual and thermal discomfort

UDI measured at different workspaces within an office building.
For true visual comfort, you don’t just need the right amount of illumination. Light needs to be well distributed to avoid discomfort.
Glare
Areas of high brightness right next to areas of low brightness cause glare, making people uncomfortable. For instance, having a bare lightbulb for your desk lamp may provide more than enough light. However, it would cause more light to shine directly into your eyes than reflects off the desktop, making it difficult to read or do other tasks. Having a shade on the lamp keeps the light from glaring into your eyes while brightly illuminating your desktop.

Unshielded light from bulbs or the sun can cause glare.
Light fixtures help distribute and diffuse light, and avoid glare.

Glare is especially important to control when using daylighting, since direct sunlight is so bright.
Light Levels and Glare Metrics
Glare is hard to measure because how light is perceived is subjective and depends on several factors (including the age of the person). However, the baseline metric used for assessing glare is luminance within a person’s field of view measured at a specific vantage point (cd/m2). This is the amount of light reflecting off of a surface into a viewers eye (see Measuring Light Levels).
Some rules of thumb include:
- Avoid contrasts greater than 10:1 when doing tasks.
- Avoid an absolute illuminance value of 2,000 lux or greater. This is because most computer monitors are 200 lux, and you want to stay within 10x of that monitor brightness.
- A contrast of 20:1 means occupants will see silhouettes. This is often okay for corridors.
- A contrast of 50:1 causes discomfort, so it should always be avoided.
In daylighting analysis, glare is often assessed using fisheye views at a worker’s head height. Also, several shorthand metrics have been developed to quantify glare, including the Unified Glare Rating (UGR) and the Daylight Glare Probability (DGP). The higher a DGP score, the more likely people will experience glare there.

Fisheye views of a workstation studying glare. With an HDR camera, a false-color overlay of luminance values on the image, and a Radiance analysis with the same conditions.
Task vs. Ambient Lighting
Good light distribution also requires the right balance between ambient lighting and task lighting. Task lighting is the light actually used to perform a task, while ambient lighting is the general background illumination in the room.
A person doing detailed drawing may need 1,000 lux on their desktop surface, but the person next to them doing ordinary paperwork only needs 500 on their desktop, and the rest of the room may only need 150 lux for people to comfortably move around the room and enjoy the space. Ambient lighting requires so much less brightness than task lighting that addressing them separately is a very common strategy to save energy in electric lighting.
Some lighting design separates ambient and task lighting by having different sources for task lighting and ambient lighting. Other lighting design splits the output of lights so that the majority of each light is directed for task lighting, and a smaller percentage is diffusely spread for ambient lighting.

For visual comfort and energy efficiency, task and ambient lighting should be separated.
For good visual comfort, light needs to have the right color and quality. Light can feel cool or warm. This is quantified by the “color temperature” and measured in degrees Kelvin.
Color Temperature
The higher the color temperature, the bluer the light is. This may seem counter-intuitive, as we think of blue as a “cooler” color than red, but it comes from the physics of black body radiation. People generally prefer bright light to be bluer, like daylight, while they prefer dim light to be yellow, like candlelight.
The color temperatures of daylight and various common light sources are below.

Color Rendering
Even with light at a specific color temperature, some parts of the spectrum can be missing. Having some spectra missing changes the way colors look, in ways that people often dislike.
This occurs when daylight is filtered through tinted windows, and with some electric lights. Sodium vapor lights are particularly known to make people’s skin look sickly.
The completeness of the spectrum of light is measured by the Color Rendition Index (CRI), which is independent of a light’s color temperature. Unfiltered sunlight has a CRI of 100, and so do ordinary tungsten incandescent lights, while sodium vapor lights have a CRI of only 5 or so. Most fluorescents have a CRI of 50 – 75 but tri-phosphor fluorescents are 85-90 and multi-phosphor fluorescents can be nearly 100. Art studios often demand a CRI of 100, but 70 is usually accepted for general applications.

Multiple colors viewed under lights of different color rendering indicies, and the spectra of each light source
Using daylight in your building is a key strategy for passive design. Letting sun into your building impacts visual comfort, as well as thermal comfort. Understanding how light from the sun enters a building as well as how to use the light once it is in a building are important considerations for successful daylighting.
Before diving into the details, watch this video. It’s a great overview of the benefits daylighting provides and some basic strategies of how to implement it.
Like most things, daylighting has advantages and disadvantages. But by becoming skilled at understanding the technical components of daylighting, you can make sure to maximize the advantages and minimize disadvantages.

Advantages and disadvantages of daylighting
Adapted from Leonard Bachman, University of Houston
Sunlight vs. Daylight
Because the sun is predictable, daylight can be a reliable light source.
Sunlight is considered as the light that enters a space directly from the sun. This type of light is generally not good for lighting an interior space. Direct sunlight can produce glare and excessive heat gain.
Daylight or skylight describes the desirable natural light in a space. Daylight results in a perceived even distribution of light that avoids the glare and ill effects of direct sunlight. You can use BIM software tools to help improve your daylighting strategies (see Daylighting Analysis).
Although natural light comes from the sun, you don’t want direct sun for daylighting design.
- Daylight is diffuse natural light from the sky. For daylighting design, you DO want daylight.
- Sunlight is direct light from the sun itself. For daylighting design, you DON’T want sunlight. It creates light that is too intense and can bring unwanted heat.
Sky Conditions
The availability of daylight is dictated by the conditions of the sky at a given point in time; which is mostly controlled by the density of cloud cover. The International Commission On Illumination (CIE) classifies fifteen different types of sky conditions that can be associated with noticeably different luminance distributions.
When conducting daylighting analysis it is important to design for a range of conditions. This means making sure that you analyze a range of sky conditions, not just a bright and clear sky. It’s unlikely that these conditions will be true for every hour of every day. Good analysis will consider bright and clear sky as well as an overcast sky.
Apertures for Daylighting
The locations and size of apertures matter a great deal if you want to utilize natural light in your building. As mentioned in the massing and orientation page, windows and other openings facing the path of the sun receive much more direct sunlight than those facing away. However, more daylighting is not necessarily better. Bringing in too much light can cause glare and overheating. See Measuring Light for Lighting and Daylighting Design.
Evenly-distributed light is critical to good daylighting, so apertures that are evenly distributed are useful. Continuous-strip apertures are even better, and apertures on multiple sides are often best. Otherwise rooms can have “hotspots”, both in terms of temperature and brightness. Often this is accomplished with horizontal bands of windows that are placed high in a space (to avoid glare and reflect light off the ceiling), or with evenly spaced vertically oriented windows that reach the full height of the room.

Evenly-spaced windows on two walls provide well-distributed light
Side Light
Light coming from side apertures like windows can only penetrate so far into a building. This is the reason why shallow floor plans are usually recommended for daylighting multi-story buildings. A simple rule of thumb for most latitudes is that daylight penetrates into a room roughly 2.5 times the height of the top of the window.

Side lighting only reaches so far into a room
Windows facing away from the sun’s path rather than towards the equator provide the most even illumination, though not the brightest. East and west facing windows can provide very bright light in the morning or evening but insufficient light at other times of day, and are very prone to glare. Windows facing towards the sun’s path get the brightest light; they can also have glare, but the glare is much easier to control than on East or West walls.
In middle latitudes and those closer to the equator, skylights can provide the brightest and most consistent illumination, but in latitudes closer to the poles they are less bright and much less seasonally consistent.
Top Light
Higher apertures are more effective at bringing light deep into the building. This often means glazing in roofs.
Skylights are not the only kind of aperture to bring light in through roofs. Other “top lighting” strategies include clerestories, monitors, and saw-tooths or other scoop-shapes. These each have their own advantages and disadvantages in construction cost and how they bring the sun into the space at different times of day and year.

Different kinds of top lighting
Top lights are usually much brighter than side lights per unit area, for the same glazing properties. A rough approximation for moderate latitudes is that a vertical monitor brings in twice as much light as a view window, an angled monitor brings in three or more times as much depending on the angle and a horizontal skylight brings in five times as much light as a view window.
Baffles are often used in top lighting to help direct the light usefully into the room, and splaying the edges of openings can help the light spread more broadly though the space.

Two kinds of splayed opening
(Image from Sun, Wind, and Light by G.Z. Brown and Mark DeKay)
Daylight Apertures vs. View Windows
Good daylighting design considers daylighting apertures separately from view windows, even when the same window is used for both. Daylighting windows have different optimal sizes, placement, and glazing properties from view windows. Windows used for both functions usually compromise performance.
Daylighting apertures are best located as high as possible on the walls or ceiling, for deeper penetration of light into the space. View windows however, must be at eye level for occupants, both sitting and standing. View windows are usually preferred to be large, while daylighting windows can be smaller.
While daylighting windows ideally diffuse the light, view windows must have clear views. This makes the avoidance of glare a top concern for view windows. Often shades and/or light shelves are placed between daylighting windows and view windows, to shade the view window while diffusing and redirecting light from the daylighting window. Also, view windows may be more heavily tinted than daylighting windows to avoid glare.

Daylighting window vs. view window
Redirecting Light
Redirecting light is the use of building elements to bounce sunlight into more desirable locations in the building. Light shelves and baffles are two strategies that can distribute light more evenly.
Light Shelves
To evenly distribute light, it is often desirable to bounce sunlight off of surfaces. Direct sunlight on work surfaces often causes glare. Light shelves are devices that both shade view windows from glare and bounce light upward to improve light penetration and distribution.
A light shelf is generally a horizontal element positioned above eye level that divides a window into a view area on the bottom and a daylighting area on the top. It can be external, internal, or combined and can either be integral to the building, or mounted upon the building.

A light shelf avoiding glare and pulling daylight deeper into the room
Light shelves are most effective on walls facing the sun’s path; on pole-facing walls they simply act as shades. Light shelves on east and west orientations may not bounce light that much further into the spaces, but are an effective means of reducing direct heat gain and glare.
Exterior light shelves reduce daylight near the window but improves the light uniformity. The recommended depth of an external light shelf is roughly equal to its height above the work plane.
To reduce cooling loads and solar gain, an exterior light shelf is the best compromise between requirements for shading and distribution of daylight. Because they are only shades, they do not change the ratio of incoming light to heat, but better distribution of light can reduce the amount needed in a space, which helps with cooling.
Light shelves may be constructed of many materials, such as wood, metal panels, glass, plastic, fabric, or acoustic ceiling materials. Considerations that affect the choice of material include structural strength, ease of maintenance, cost, and aesthetics.
Light shelves and vertical fins do not need to be opaque; when they are transparent but diffusive, they can help evenly distribute light without reducing the total amount of light significantly.

Diffusing glass fins on a west-facing wall help distribute light evenly without reducing incident light.
Sizing Light Shelves
The orientation, height, position (internal, external, or both), and depth of the light shelf are critical. A rule of thumb is that the depth of the internal light shelf be approximately equal to the height of the clerestory window head above the shelf. The optimal width and placement of light shelves depends on the site’s location and climate.
Baffles
When light shelves are oriented vertically, they are known as baffles. They are used with skylights or roof monitors to better distribute daylight and avoid glare. Designing the optimal height and placement of baffles is done the same way as designing light shelves.

Baffles in a roof monitor avoid direct glare while bringing in the sun’s full brightness
Views
Views are the ability for building occupants to see landscape, objects, and people outside the building. For many occupants, the outlooks from their space or public areas are a major factor in their enjoyment of the site and it can add considerably to the ambience of a building. In addition, views of nature and of social spaces have been shown to improve worker productivity, student test scores, and people’s health.
Views are measured by drawing a line of sight from a location in the building to any exterior windows; if the line of sight to an exterior window is unbroken, that location has a view. The line of sight must be drawn at the appropriate height for occupants; for instance, typical office workers or students are usually sitting, with eye level assumed to be 42″ (1.1m) above floor level by some building rating systems1.

Views should not be obstructed by furniture or walls in the room.
While some people may be tall enough to see over obstructions, an average height should be assumed.
In order to be considered a view, the window must provide a reasonable vantage point outside the building. One rule1 considers view windows (“vision glazing”) to be any glazing above 30″ (.75m) and below 90″ (2.3m) from the finished floor in a room. Skylights and very high windows don’t count.

View glazing must be within certain heights to see out of it.
Building massing, orientation, and window locations should attempt to maximize views of natural features or social spaces, and minimize views of support facilities.

Views of nature and social space
Views with higher degrees of complexity and change are more engaging than simple static views. For instance, views of the horizon and landscape are better than views of the sky alone; views of public squares that are actively populated are better than views of empty courtyards; views of blank walls scarcely count as views at all.
People generally prefer wider apertures for views, and dislike framing or bars that break up the view. If a view must be broken up, vertical framing is less objectionable than horizontal framing.

Two angles on the same view, with more and less complexity;
also showing vertical bars breaking up the view
Glare in Views
Views of sunrise or sunset and views of highly reflective surfaces, such as snow, water, or mirrored-glass buildings, can cause excessive glare. Occupants should be able to shield themselves from the glare of these views using shades or other means, or windows should be placed relative to occupants to avoid such views.

Glare mitigated by tinted windows
View apertures can use glazing properties that minimize glare while still allowing clear views. Visual light transmittance can be low (even .3 or lower) while still affording excellent views. The main concern is that most occupants dislike looking out through colored windows, so they prefer neutral tones in the tinting. However, some tints can be found pleasing.
Daylighting vs. Views
View windows are often separate from daylighting windows, because the placement, area, and glazing properties that are optimal for daylighting are often not optimal for views, and vice-versa. See the daylighting strategies for the difference between view and daylighting apertures.